¶ Cameras
The “Cameras” subsection of the “Settings” section contains a list of cameras saved on the platform. RTMIP supports RTSP cameras (standard IP cameras), USB cameras, MJPEG video streams, images and video files.
The camera list displays the camera status: blue color means that the camera is working without failures, red color - there are errors in the camera, or it does not work at all, yellow color means that there were errors, but at the moment the camera is working in normal mode. With the switch, you can connect or disconnect the camera.
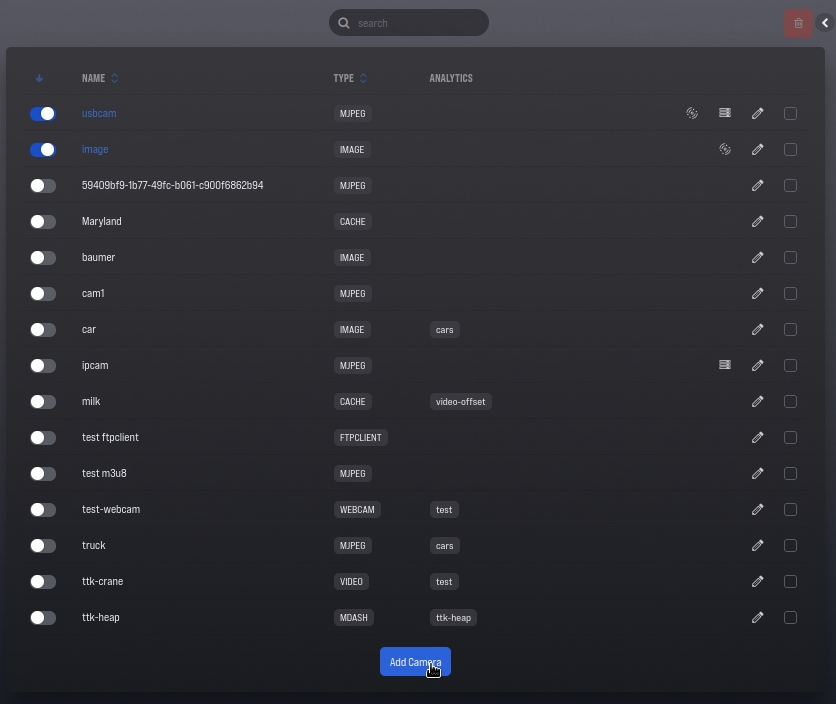
The list displays basic information about each camera: name, type, sector to which the camera is assigned, and its description.
To delete one or more cameras, select them using the "checkbox" and then click the delete button at the top of the interface.
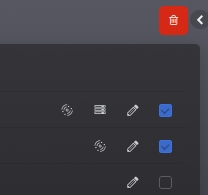
You can change the camera settings using the "Change" button at the end of each line. The "Add camera" button will open the form for adding a new camera to the system. On the camera editing page, if the camera is already connected and functioning, the video stream and information about it will be displayed.
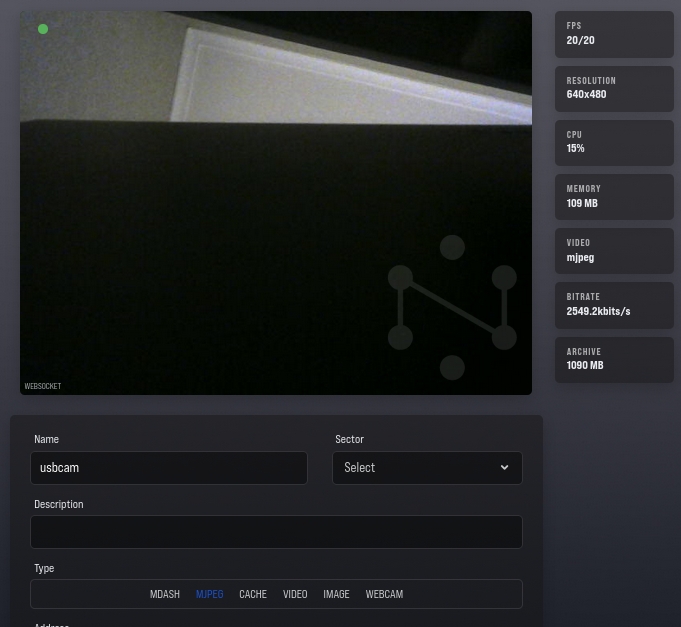
The camera edit form allows you to specify: name and description of the camera, link it to a specific sector.
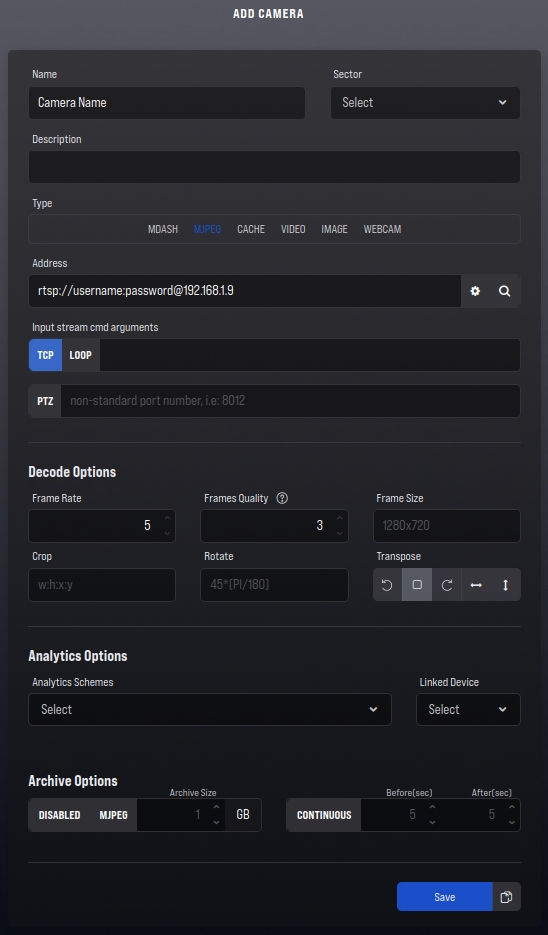
Cameras can be of different "types": MDASH, MJPEG, CACHE, VIDEO, IMAGE, WEBCAM. The type of camera depends largely on the source. So, for an IP camera, you can choose the type MDASH or MJPEG. For USB camera - MJPEG. If you need to process a video file, then you must select the type CACHE or VIDEO. For images (.jpeg) - type IMAGE.
- Type MDASH - saves video in small fragments (2-5 sec.) without any transcoding to disk. Users can simultaneously view the video stream from the camera, actually viewing such fragments that are loaded in the background by the browser. MDASH gives a slight delay of 2-10 seconds. Since MDASH does not transcode the incoming video stream, there may be problems when playing in a browser, because, for example, browsers do not support the H265 compression protocol. If you view camera video over the Internet with a low connection bandwidth, viewing problems may occur due to the fact that the fragments will not have time to download.
- Type MJPEG - displays in the browser individual frames that will be decoded from the video stream. Usually MJPEG, especially at a high frame rate, gives a significant load on the network. However, this type of camera has minimal latency, and when viewed over the Internet at a low connection speed, this type of camera will allow you to see individual frames.
- Type CACHE - designed to work with video files. When the camera is started, the video file is decoded into frames on the server, the frames are sent to the analytics, the result of the analytics is cached in the server's memory. This process can take some time, especially if the video is high resolution or heavy analytics are being used.
- Type VIDEO - also designed to work with video files. When viewing a camera with this type, the browser will send the viewed frames one by one to the server for processing by analytics and neuroservices. If heavy analytics are used for the camera, then the result lag can be significant.
- Type IMAGE - works with images (.jpeg), which are processed by the server according to the specified frequency. This type is typically used for testing and customizing analytics.
- Type WEBCAM - uses the camera available on the user's device through a web browser, for example from a phone.
In the Address field, you must specify where the platform will receive the video stream, frames from, or specify the path to the file. For IP cameras, the address will be in the format: rtsp://username:password@ip-address:port/path/to/stream, for example: rtsp://admin:admin@192.168.1.9/Streaming/ Channels/101.
The MDASH camera type also allows you to specify the address of an additional stream. If an additional stream is specified, then it will be displayed in the browser, while frames from the main stream will be used for analytics.
The field "Additional keys of the incoming stream" allows you to switch the connection to the IP camera from UDP protocol to TCP, this can prevent frame loss in case of a poor connection between RTMIP and the IP camera. The parameters specified in the main field will be used to initialize the connection to the camera.
In the "Analytics schemes" field, you must connect previously created analytics that process and identify objects on the incoming video stream.
"Archive recording parameters" determine whether the video stream should be saved to the video archive, the recording format, and the maximum size in gigabytes.
¶ Adding Regions and Lines
Some analysts require regions or lines on the camera. Such scenarios include finding objects in a particular zone, entering and exiting a zone, crossing a line, and so on.
To add a region, click on the plus icon in the "Regions" field. After that, it will be possible to specify the name of the region and select its color.
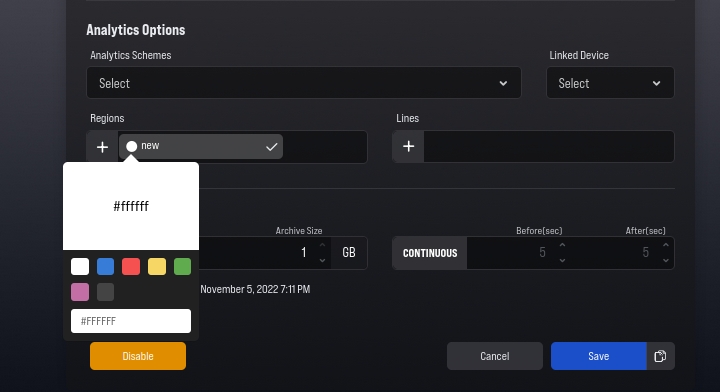
Next, you need to scroll the page to the very top and create a region on the video stream from the camera itself. The left mouse click adds a new region point, the right mouse click on the added point can remove it. You can change the location of the point by dragging. After creating the region, you need to return to the "Regions" field and confirm the creation by clicking on the checkmark icon.
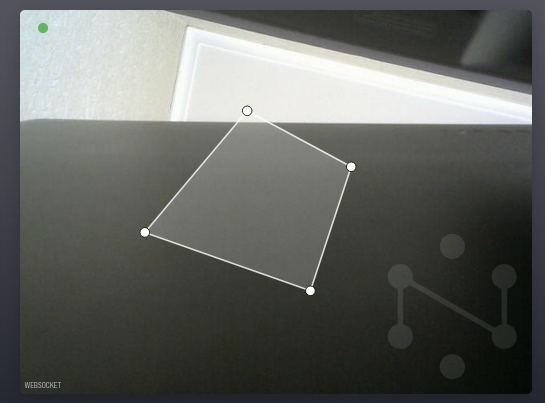
After creating a region and saving changes in the camera, it will be available for selection in the "Region" block in analytics .